
Full of the flavours of autumn, this easy toffee apple tart is the perfect no-fuss dessert for Halloween parties or cosy entertaining. It looks impressively beautiful but takes just minutes to make. With a ginger biscuit crust, a layer of Dulce de Leche caramel and sweet Braeburn apples, it’s easier than making apple pie and guaranteed to impress your guests!

Updated October 2025 for seasonal entertaining
Autumn is officially here in the Cotswolds! The air has got chilly, the leaves have fallen and the the familiar oranges and reds are back again. This of course means that it is entirely acceptable to spend all day cozied up in your pyjamas, watching Harry Potter and having some down time!
Seriously is there nothing more warm and comforting that a PJ day? Well, according to you all over on the Crumbs and Corkscrews Facebook page, there is; and it’s the smell of baking with apples.
Freshly made apple pie was a staple in our house growing up, and now I’m taking the nostalgia of our family recipe and giving it a deliciously easy twist. This caramel apple tart brings all the comfort and seasonal coziness of a traditional apple pie, but without faffing with pastry – making it the perfect dessert for busy bakers who still want that impressive dessert centrepiece.

Why this toffee apple tart is perfect for autumn entertaining
The fact that this tart looks so pretty and has all the smells and flavours of Autumn baking, making it ideal for Halloween dinner parties, casual gathering desserts or just cozying up with a slice on the sofa. But wait, there’s so much more…
- Sweet and juicy apple layers with a touch of cinnamon balance the flavour with…
- The gentle, fiery taste of the Ginger Nut biscuit crust that warms you from inside and…
- That sweet and creamy Dulce de Leche drizzled over the top, and…
- The real magic is that it’s super quick and easy to make, no pastry skills needed.
This caramel apple tart strikes the perfect balance between elegant and achievable every time. It’s the kind of dessert that looks like you’ve spent hours in the kitchen, but the secret is you’ve barely broken a sweat!

What apples are best for an apple tart
With over 9,000 varieties of apple out there to choose from, the argument for which apple is best for a tart could go on and on. But actually, it’s really quite an easy decision to make – what you’re looking for is something that has a touch of sweetness but is also firm to bite into.
The sweetness works well with the Dulce de Leche caramel, while the firmness means that the apple doesn’t distingerate when the tart is baked.
Therefore you are looking to use varieties such as Russet, Cox, Pippin or Braeburn, which is the ones I’ve used here. If you prefer to use cooking apples, the Bramley variety is best.

What you’ll need to make this apple tart
View my Amazon shopping list with equipment and ingredients.
We’re going in for this recipe with easy ingredients and absolutely no faff when it comes to making the tart. So when you’re ready, here’s what you’ll need…
The Ingredients
- Ginger Biscuits – I have made the tart using both good old Ginger Nuts and also Foxes Crunch Creams. I personally think that the Ginger Nut biscuits give the best flavour and structure to the tart crust. If you can’t get either of these, you could substitute for Digestive biscuits, Golden Oreos or Gingerbread.
- Butter – When melted, this will bind the biscuits crumbs together for the tart crust. You’ll also need a little extra butter for glazing the apples.
- Braeburn Apples – I’m using these as they are my favourite apple. They have a good balance between the natural sugars and acids in the tart, and are also firm, so hold their shape when baked.
- Cinnamon Caster Sugar – You only need a touch here for glazing the apples before you bake them. I use cinnamon sugar as it adds more of that autumn flavour, but you can use regular white caster sugar instead.
- Lemon Juice – Again just a drop for the apple glaze, so either use fresh lemon juice if you have it, or bottled juice such as Jif Lemon.
- Dulce de Leche Caramel – Or you can use a homemade thick and creamy caramel sauce. Remember you want to use a sauce, not a syrup or sugar caramel as they will bake hard. It is the smooth and creamy caramel that you want to use. If you can get it, Carnation Caramel is perfect!
Recommended ingredients


The Equipment
When I say there is nothing complicated or fancy in this recipe, I really mean it; especially when it comes to the equipment! Have a rummage through the cupboards and grab yourself…
- 8-inch Loose Base Tart Tin – If you don’t have a loose base tin, you can use a pie dish inside. You will just have to slice and serve from the dish instead.
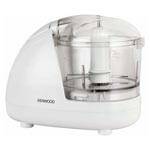
- Mini chopper or Food processor – If you have either of these, they are great to crush the biscuits for the tart crust. But if you don’t, there’s no need to panic you can pop the biscuits into a Ziploc bag instead and bash with a rolling pin.
You’ll also find you need a couple of spoons, a chopping board, sharp paring knife, peeler and a small saucepan for melting ingredients in, unless you have a microwave.
Recommended equipment


How to make the best toffee apple tart
Full measurements and instructions can be found on the printable recipe card
Now you guys know that I love a deliciously easy bake and this toffee apple tart doesn’t fail to impress! With those fine apple slices arranged in the tart case, you’re going to get that WOW every time you make it. Let’s take a look at how easy it is to make…
The Base
- For the biscuit base, we’re going to be using a Ginger Nut biscuit, or you could use a Ginger Crunch Cream. Start off by crushing the biscuits until they are a very fine sandy texture. I use a food processor, but you can use a mini chopper or bash them with a rolling pin, in a Ziploc bag.
- Pop the crushed biscuits into a large mixing bowl, and add in the melted butter, mixing it together until it comes together in a wet mixture.
- Pour the biscuit mixture into the loose-base tart tin, with your fingers work into the fluted edge of the tin to form the crust. Then smooth the base of the crust with the back of a spoon.
- Pop the tart crust it into the fridge for 30 minutes to an hour, to firm up.
TOP TIP: Make sure the crust is well packed in the tin. Use a tumbler or measuring cup to really pack down the biscuit crust.
The Apple Filling
- While the tart is chilling, peel, core and finally slice the Braeburn apples. Pop these in a large bowl and sprinkle with ground cinnamon. Alternatively, you can sprinkle with sugar, I use cinnamon sugar – regular caster sugar with an added 1/2 teaspoon of ground cinnamon.
- In a saucepan over a low heat, gently warm and melt together butter, caster sugar and lemon juice and allow to cool down slightly.
Assembling the Tart
- When the tart crust has chilled, it’s time to assemble everything!
- Spread a layer of Dulce de Leche over the base of the tart, then arrange the apple slices in a circle around the tart. Layer the apple slices so they overlap and make sure to use plenty of fruit.
- Fill the centre of the tart with extra apple slices, then pour over the melted butter, sugar and lemon juice.
Baking the Tart
- Bake the tart in a preheated oven at 180C/350F for 20 minutes, then pour over the remaining Dulce de Leche and bake for a further 10 minutes.
- When it’s baked, make sure the tart is completely cooled before removing from the tart tin and serving.
Step by step live video
Serving suggestions & variations
I love this tart served warm from the oven with a scoop of vanilla ice cream or a good dollop of whipped cream. But for autumn and festive entertaining, it goes really well with a spiced cider or hot mulled wine – especially on bonfire night!
If you’d like to bring in seasonal changes, then try swapping the apples for pears instead. Or you can lift the apple tart recipe by adding a pinch of nutmeg and allspice for extra warmth, or maybe try a touch of pumpkin spice.
Frequently asked questions
How many does the tart serve?
An 8-inch round tart will serve 6-8 slices.
How should the apple tart be stored?
Once the tart has completely cooled, store the tart in the fridge, either covered loosely with cling film/ plastic wrap or foil.
How long does the tart keep for?
The tart is best eaten within 1 day of making, but will keep up to 3 days in the fridge.
Can the tart be frozen?
Yes, you can freeze the tart. It will keep for up to 3 months in the freezer. To protect the tart, wrap it in cling film/ plastic wrap with an outer layer of kitchen foil to protect it from ice crystals forming. Before serving the tart, allow it to defrost completely.

Can you use a pastry tart case instead?
If you are not a fan of a biscuit tart crust you can swap this for a pastry case instead. You could either go for…
- Ready-Made Pastry Cases – If time is not on your side or you want a really quick and easy dessert, then sweet shortcrust pastry cases are perfect cheats. There’s no need for blind baking or chilling biscuit crusts, just layer in the Dulce de Leche and apples, and pop in the oven.
- Make Your Own Pastry – I know it might feel a bit daunting, but trust me, sweet shortcrust pastry is one of the easiest and quickest pastries to make. If you don’t want to use a biscuit crust, then why not give it a go.

Top tips to get the perfect apple tart
- Make sure to fully crush the biscuits – To get a firm, tart crust, that doesn’t fall apart, crush the cookies with a food processor or mini chopper. You are looking for a fine sandy texture with no big lumps; any lumps with cause the crust to break up when the tart is sliced.
- Chill the base for at least 30 minutes – As you are baking the tart, it’s important to make sure that the base is properly chilled and set before popping it in the oven. If the biscuit crust isn’t properly chilled, the butter will melt quickly and butter up.
- Slice the apples finely or into chunks – If you want to get the pretty sliced look of the apple tart, then you need to make sure you cut the apple into fine slices for layering up more easily. You can also cut the apple into chunks about 1cm in size and scatter into the tart crust instead.
- Let the tart cool properly – Hot toffee apple tart straight from the oven might sound amazing, but slicing into it too early when the apples are still wet will cause the biscuit crust to break up. So the best thing to do is leave it to fully cool, then slice up; and if you want to serve the tart warm, give it a quick blast in the microwave.

More autumn flavour recipes to try
If you liked this toffee apple tart recipe here are some other recipes that I think you’d enjoy…


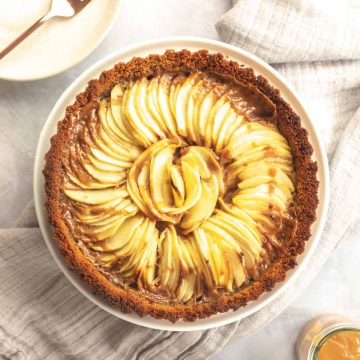
Toffee Apple Tart
Equipment
- 8-Inch Loose Base Tart Tin
- Mini Chopper
Ingredients
- 200 g Ginger Nut Biscuits or other ginger biscuits
- 110 g Butter Unsalted, Melted
- 3 Braeburn Apples or other tart apple
- 15 g Caster Sugar or Superfine Sugar
- 1.5 tsp Lemon Juice
- ½ tsp Ground Cinnamon
- 150 ml Dulce de Leche or Caramel Sauce
VIDEO
Instructions
- Make the Biscuit Crust – Add the Ginger Nut biscuits into a food processor, and blitz until they form a fine crumb, then add to a large mixing bowl. Make a well in the centre of the biscuit crumbs, and pour in the melted butter. Save 2 tablespoons of the melted butter for later.
- Mix together until well combined, and then pour into an 8 inch loose base tart tin. Press down the biscuit base and push up into the fluted edge of the tart tin.
- With a glass or a measuring cup, gently push the biscuit mixture to make sure it is well compacted. Smooth over the crust with the back of a spoon. Chill in the fridge for at least 30 minutes to 1 hour.
- Make the apple filling – Peel and core the apples, then finely cut into slices about 3-5mm in thickness. Place the apples into a bowl, then sprinkle over the cinnamon. Toss the apples until they are all coated. Alternatively you can sprinkle with 1 teaspoon of cinnamon sugar.
- Add the sugar and lemon juice to the remaining butter and mix together until the sugar is dissolved. You may need to gently reheat the mixture, either over a low heat or in 30 second blasts in the microwave.
- Assembling the tart – Spread approximately 100ml of the Dulce de Leche over the chilled tart crust.
- Arrange the apple slices, layering them so they slightly overlap each other, fanning out to form a circle around the tart. Make sure to use plenty of fruit.
- Fill the centre of the tart with extra apple slices, then pour over the melted butter, sugar and lemon juice.
- Baking the tart – Preheat the oven to 180C/350F.
- Place the tart tin onto a baking sheet, and bake for 20 minutes. Then pour over the remaining Dulce de Leche and bake for a further 10 minutes.
- When the tart has finished baking, place on a wire-rack to cool. Wait until the tart is completely cooled before removing from the tin and serving.
Notes
- How should the apple tart be stored?
Once the tart has completely cooled, store the tart in the fridge, either covered loosely with cling film/ plastic wrap or foil. - How long does the tart keep for?
The tart is best eaten within 1 day of making, but will keep up to 3 days in the fridge. - Can the tart be frozen?
Yes, you can freeze the tart. It will keep for up to 3 months in the freezer. To protect the tart, wrap it in cling film/ plastic wrap with an outer layer of kitchen foil to protect it from ice crystals forming. Before serving the tart, allow it to defrost completely.
Nutrition
DISCLAIMER
The nutritional information provided is approximate and is calculated using online tools. Information can vary depending on various factors, but we have endeavoured to be as accurate as possible.

