
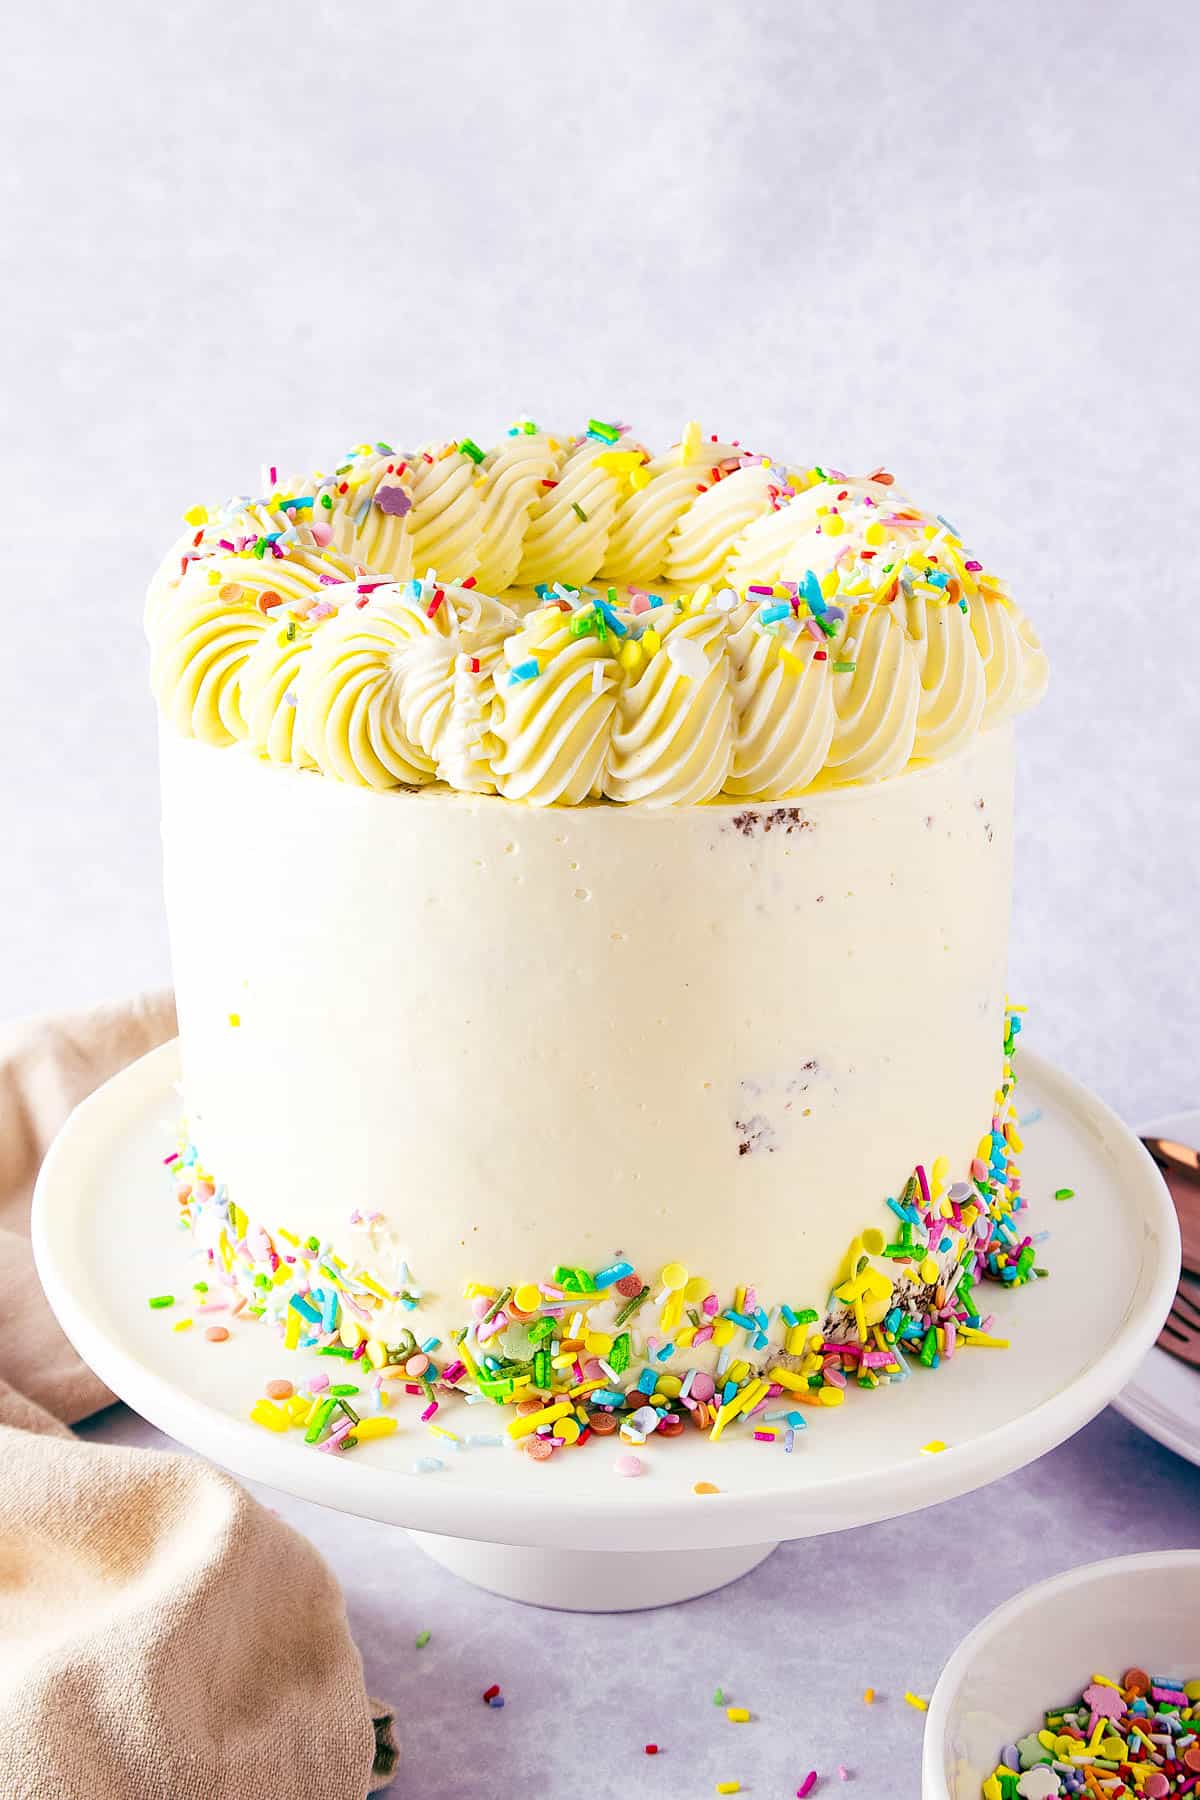
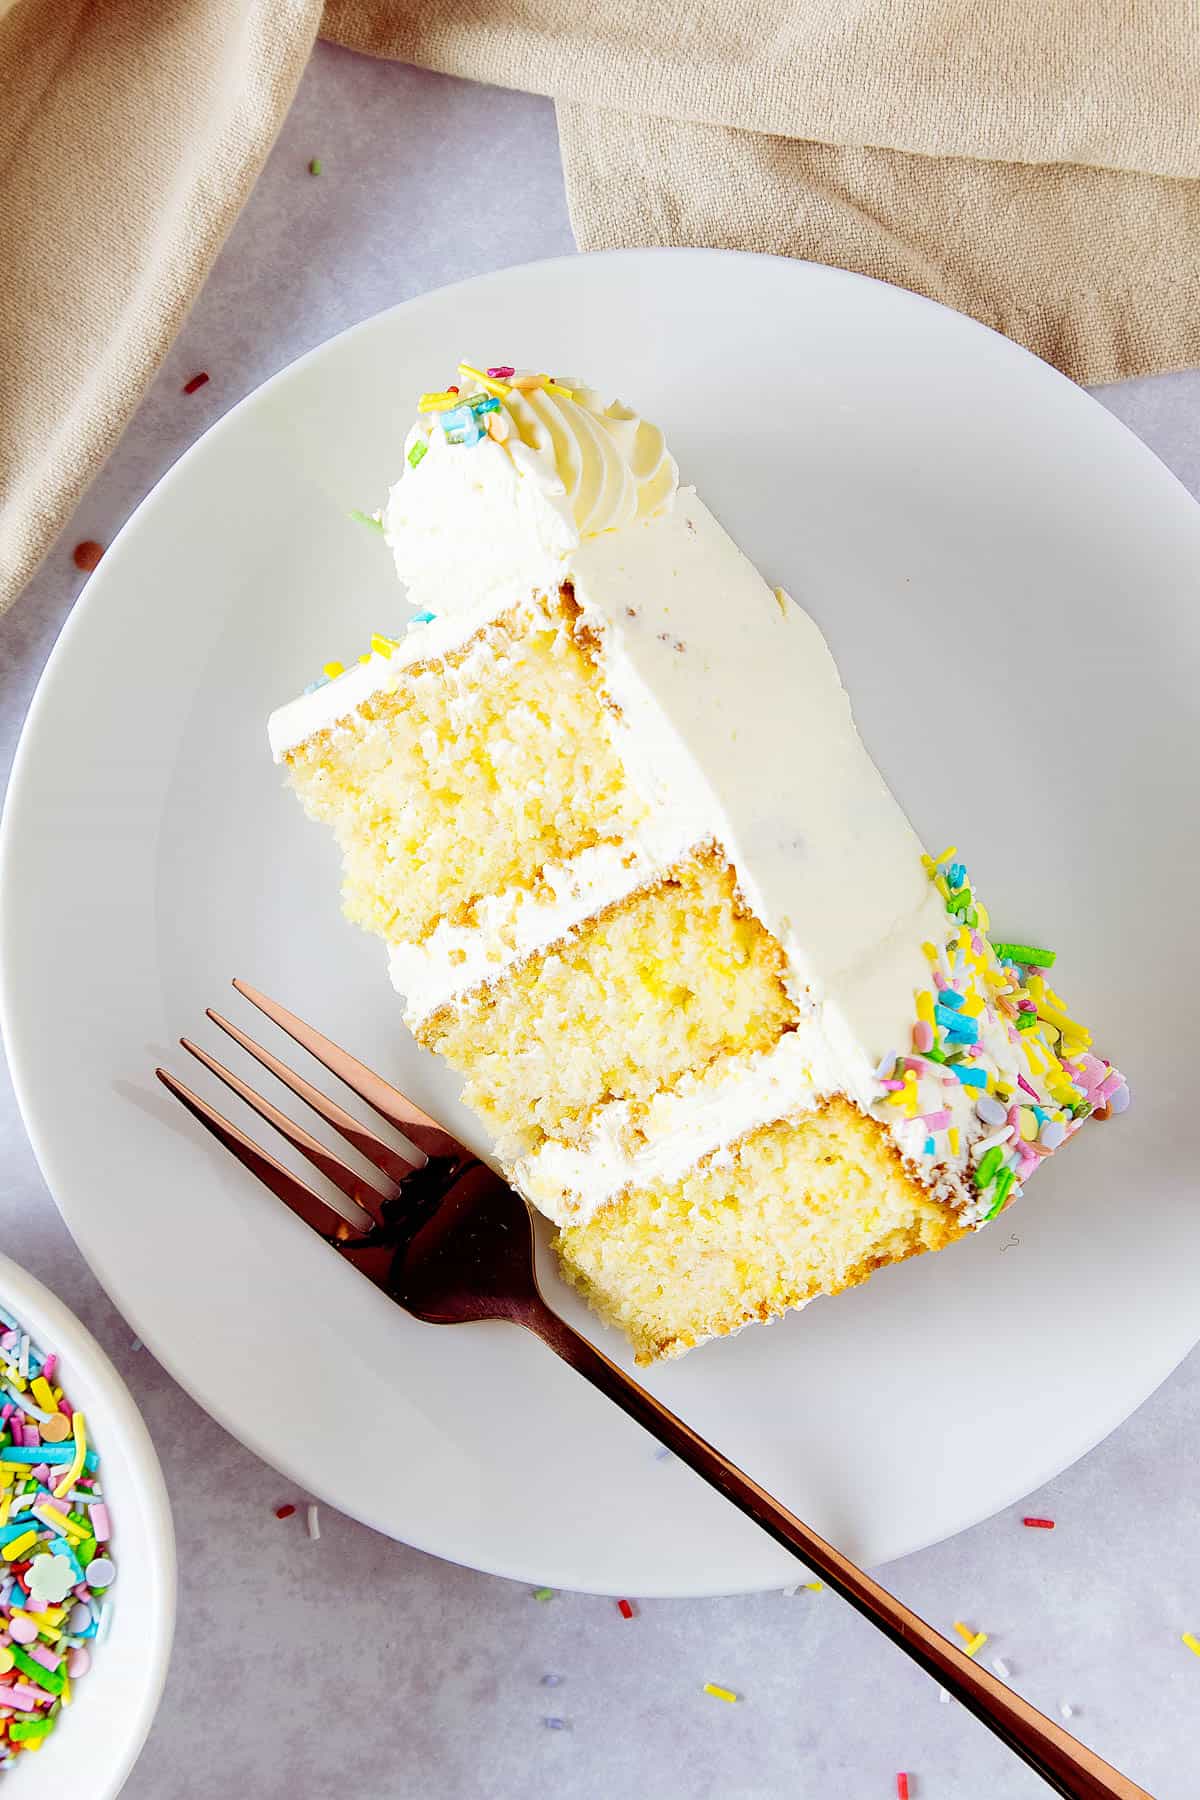
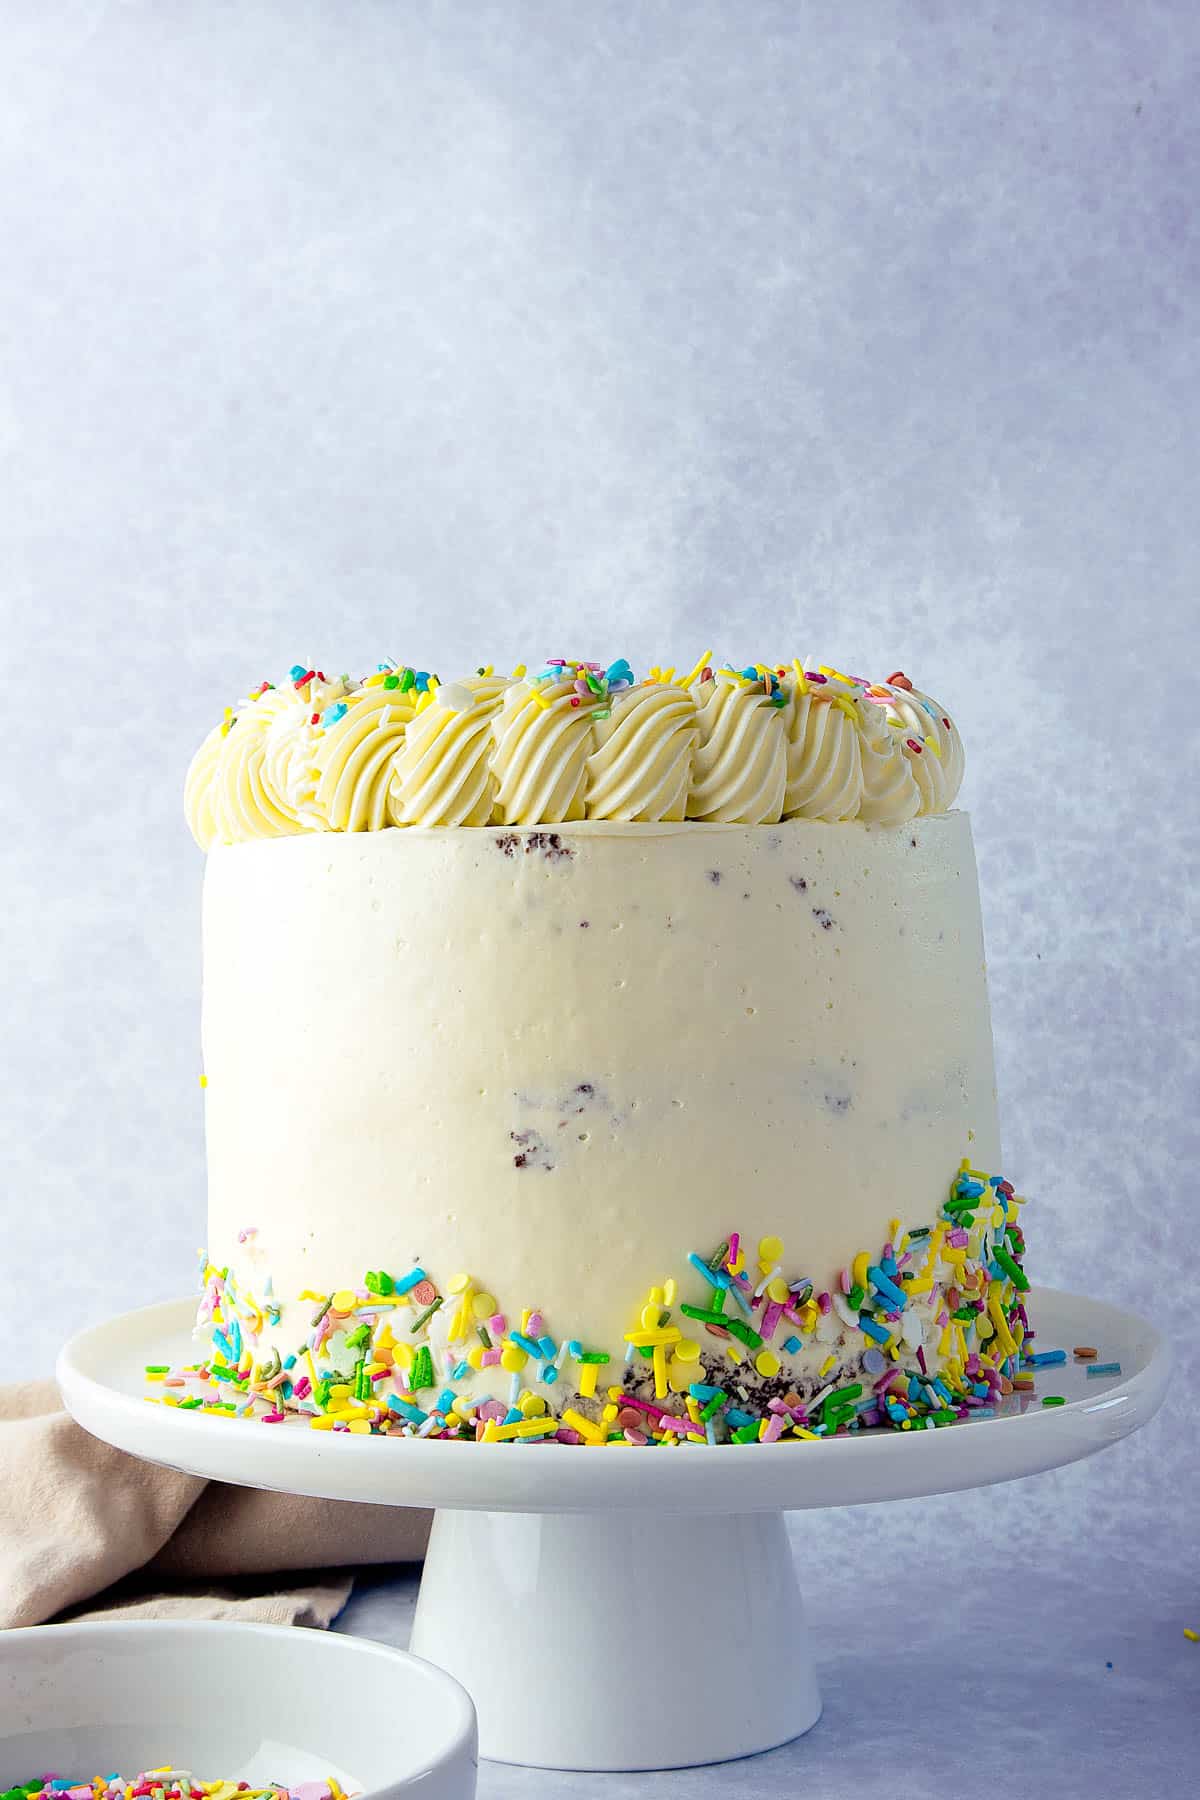
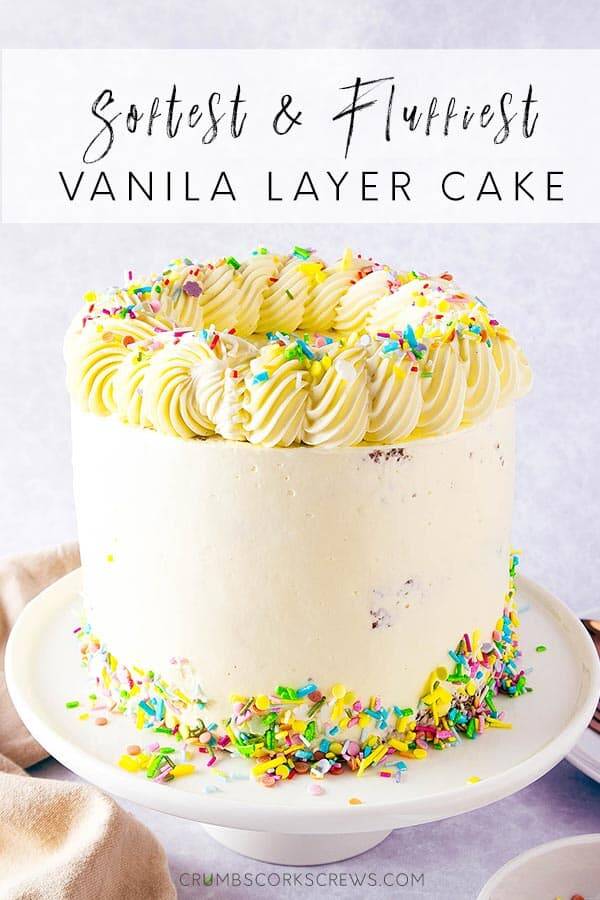
You’ll want to make this delicious and easy vanilla layer cake over and over again. Sweet, fluffy cake layers with silky swiss meringue buttercream, is perfect for celebrating birthdays, weddings or any other special occasion.
What’s the occasion?
Actually, do you even need an occasion for cake? I certainly don’t.
But if there is an occasion then it would be rude not to celebrate with cake, wouldn’t it?
So as I celebrated becoming another year older, it was time to comply with that unwritten rule of ‘birthday treats’ for the office! Sure I could have picked up something from the store, but that’s not my thing.
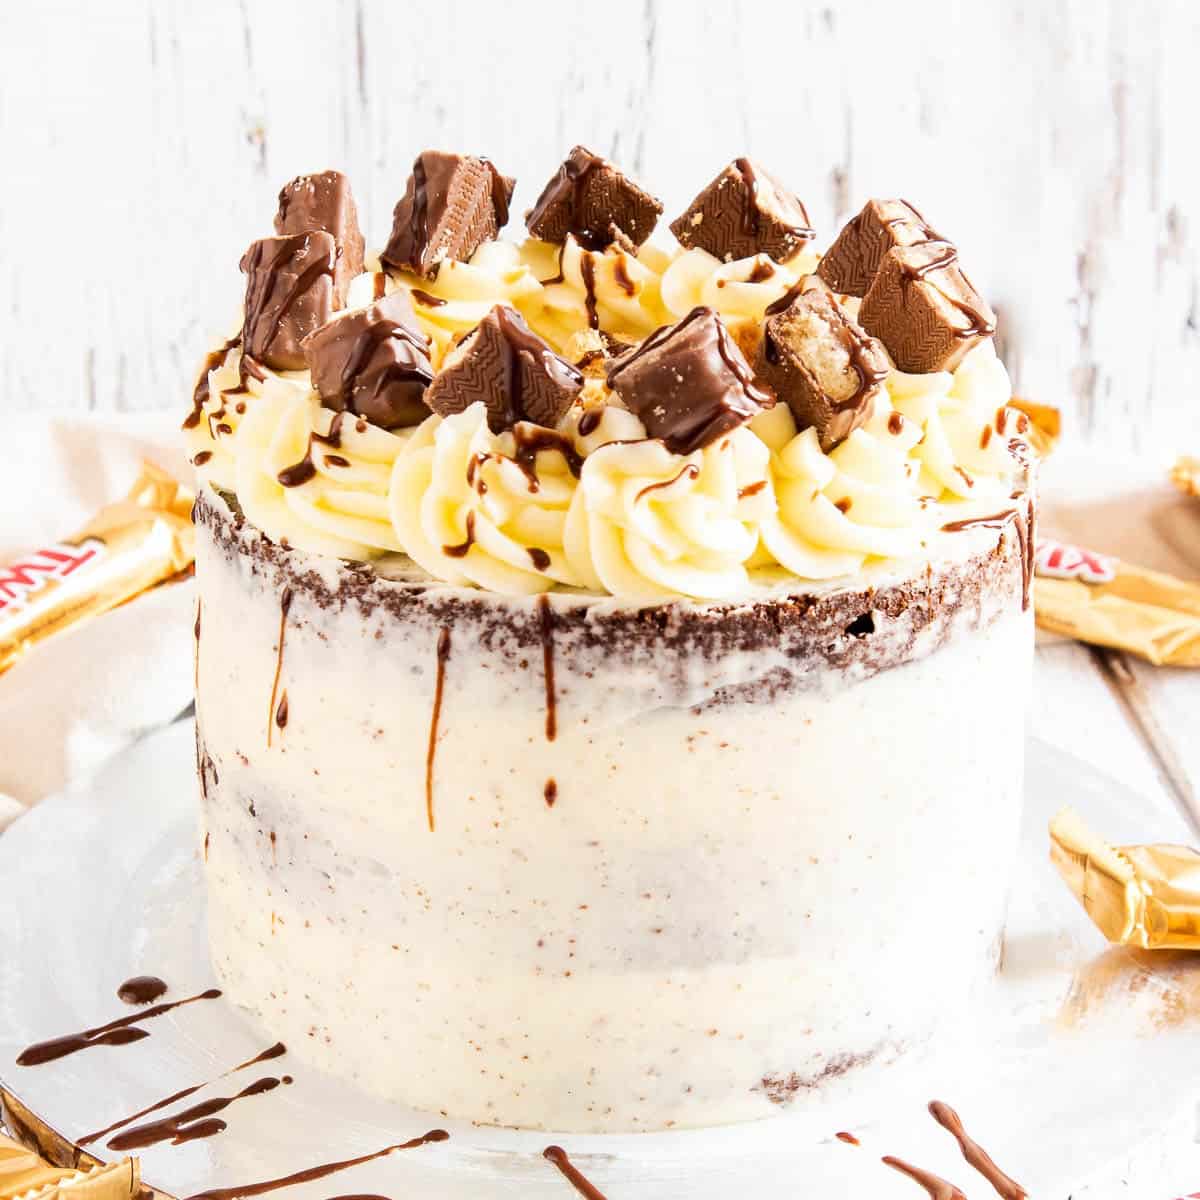
From chocolate sundae cupcakes to a lemon curd meringue roulade and that show-stopping Twix cake, the office sort of expects me to bake. And well, it’s not like I need an excuse to.
With everything that I’d made for the office, I couldn’t believe I hadn’t made my favourite vanilla cake for them. Until now…
I hope you enjoy this recipe as much as my work buddies. It didn’t last long, someone complained that it had vanished by 10am!
‘Just vanilla’
How many times have you turned cake down because it’s ‘plain old vanilla’?
Vanilla gets a pretty bad deal in my opinion, and undeservedly so!
The thing is, a great vanilla cake is one of the happiest foods on the planet. It’s usually the first cake we learn to make, the first we taste, and the one that celebrates every occasion from birthdays to weddings. What’s not to like about it!
And whilst it’s so simple to make, it’s also so simple to get wrong too – and no one wants to celebrate with dense dry cake, do they?
The Fluffiest & Easiest Vanilla Layer Cake
Full measurements and instructions can be found on the printable recipe card
What if I told you that I’ve got the easiest recipe, that will stop you reaching for boxed cake mix?
That’s going to give you the softest, most beautifully sweet cake layers?
Whether smothered in a silky swiss meringue buttercream or classically iced with sugar fondant, is one recipe you’ll want to make if you have something to celebrate or not!
What makes it the best recipe?
Apart from that it’s vanilla, and vanilla really is THE BEST flavour there is; there’s also…
- Self-Raising Flour – will give a soft, fluffy and light texture to your cake. Switch out the all-purpose or plain flour as these will usually result in a heavier, denser cake.
- Buttermilk – a superpower ingredient that works with the eggs to create a cake batter that produces perfectly moist cakes.
- Real Butter – creamed butter with a pinch of salt gives you the rich, buttery taste that just melts in your mouth. There’s no margarine or cake spread here.
- Vanilla Bean Paste – if you’re looking for a true vanilla flavour, then bean paste is the ultimate ingredient. If you can’t find vanilla bean paste, then a pure vanilla extract will work a treat. But avoid synthetic vanilla essence, it’s not a true flavour.
Recommended equipment


Top tips for making the softest cake
- Room temperature eggs – Adding cold eggs to your cake batter mix can cause it to curdle. Yes, we can fix that with dry ingredients, but also when baking, you’ll be working first to bring the eggs up to temperature. So make sure your eggs are at room temperature, and if not, you can warm them up by popping them in a bowl of warm tap water for 10 minutes.
- Softened butter – have you ever tried to cream fridge-cold butter? It’s a nightmare! To get that beautiful buttery taste and texture, make sure your butter is softened but not too soft. To test it, press a clean finger in the butter – it should leave an indent but not go all the way through.
- Make your own buttermilk – if you can’t find it in the chiller cabinet of the store, then add 1 teaspoon of lemon juice or vinegar to 200ml (1 cup) of full-fat milk. Pop it to one side for 15 minutes, whilst sorting your ingredients out, by which time the milk will be ready to use.
- Let the cake cool down – I know it smells amazing when it comes out of the oven, but don’t be hasty and take shortcuts, trying to frost still-warm cakes always ends up a mess. Ideally, let the cake layers cool on a wire rack or you can refrigerate or freeze them if in a hurry. Remember to take them out of the cake pans first!
How long will the cake and buttercream last?
The cake will keep in an air-tight container for up to 3 days, or you can freeze it for up to 1 month, but make sure it is well wrapped before freezing.
If you have any leftover swiss meringue buttercream, pop it in a sealed container in the fridge for up to 2 weeks, or the freezer for 3 months.
More layer cakes recipes to try
If you liked this vanilla layer cake recipe here are some other cakes that I think you’d enjoy…

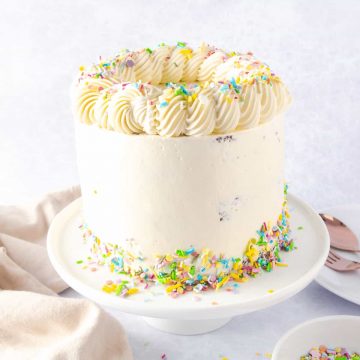
Vanilla Layer Cake
Ingredients
For the Cake
- 175 g Butter Unsalted, Room Temperature
- ¼ tsp Fine Sea Salt
- 300 g Caster Sugar or Superfine Sugar
- 3 Eggs Medium
- 280 g Self-Raising Flour
- 2 tsp Baking Powder
- 240 ml Buttermilk
- 1 tsp Vanilla Bean Paste or Vanilla Extract
For the Swiss Meringue Buttercream
- 6 Egg Whites Large
- 300 g Caster Sugar or Superfine Sugar
- 450 g Butter Unsalted, Room Temperature
- ¼ tsp Fine Sea Salt
- 1 tsp Vanilla Bean Paste or Vanilla Extract
- Rainbow Sprinkles
Instructions
- Make the cake: Preheat oven to 160C/325F and line a deep 6-inch cake tin with baking parchment. Alternatively, if you have three individual 6-inch cake tins, you can bake the layers separately.
- Using a stand mixer with the paddle attachment, beat the butter, salt and caster sugar together until soft and creamy. Alternatively, use an electric hand whisk and a large mixing bowl.
- Add the eggs, one at a time, beating between each egg until well combined. The mixture should be thick and runny. Then add the vanilla bean paste.
- Sift the flour and baking powder together, and gently fold half of the mixture into the cake batter. Add half of the buttermilk and mix in well. Repeat with the rest of the dry ingredients and the remaining buttermilk. The cake batter should be smooth and creamy.
- Split the cake batter between the cake pans, and smooth over.
- Bake for 20-25 minutes or until a skewer inserted comes out clean. Allow the cakes to cool in the tin for 10 minutes, then turn out onto a wire rack to cool.
- Make the swiss meringue buttercream: In a large bowl or the stand mixer bowl, add the egg whites, vanilla bean paste and caster sugar, and whisk until combined.
- Add 1-2 inches of water into a pot or saucepan, and bring to a simmer. Then place the bowl over the pot and stir constantly with a balloon whisk until the mixture is hot and the sugar has dissolved, or until a sugar thermometer reads 71C/160F, about 3 minutes.
- Return the bowl to the stand mixer, and whisk the egg whites on medium-high with the balloon whisk attachment, until stiff and the bowl has cooled down. The bowl should feel cool to the touch, about 5-10 minutes.
- Cube the butter, and then switch the stand mixer attached to the paddle. On slow-medium, add the cubed butter a bit at a time with the salt, and mix until the buttercream is smooth.
- Assemble the cake: Using a large serrated knife, level the top of the cake layer and fix the ‘bottom’ layer to a 6-inch cake board with a little of the frosting.
- Using a palette knife or a piping bag and nozzle, spread or pipe buttercream across the bottom layer. Repeat for the next layer.
- Top the cake with the final layer, bottom-side up, and spread the buttercream over the top and sides of the cake. Use a palette knife or cake side scraper to take off the excess buttercream and give a smooth finish. Chill the frosted cake for 15 minutes in the fridge, to allow the layer of buttercream to firm up.
- Add another layer of buttercream to the top and sides of the cake, and remove the excess. Chill the frosted cake for another 15 minutes in the fridge.
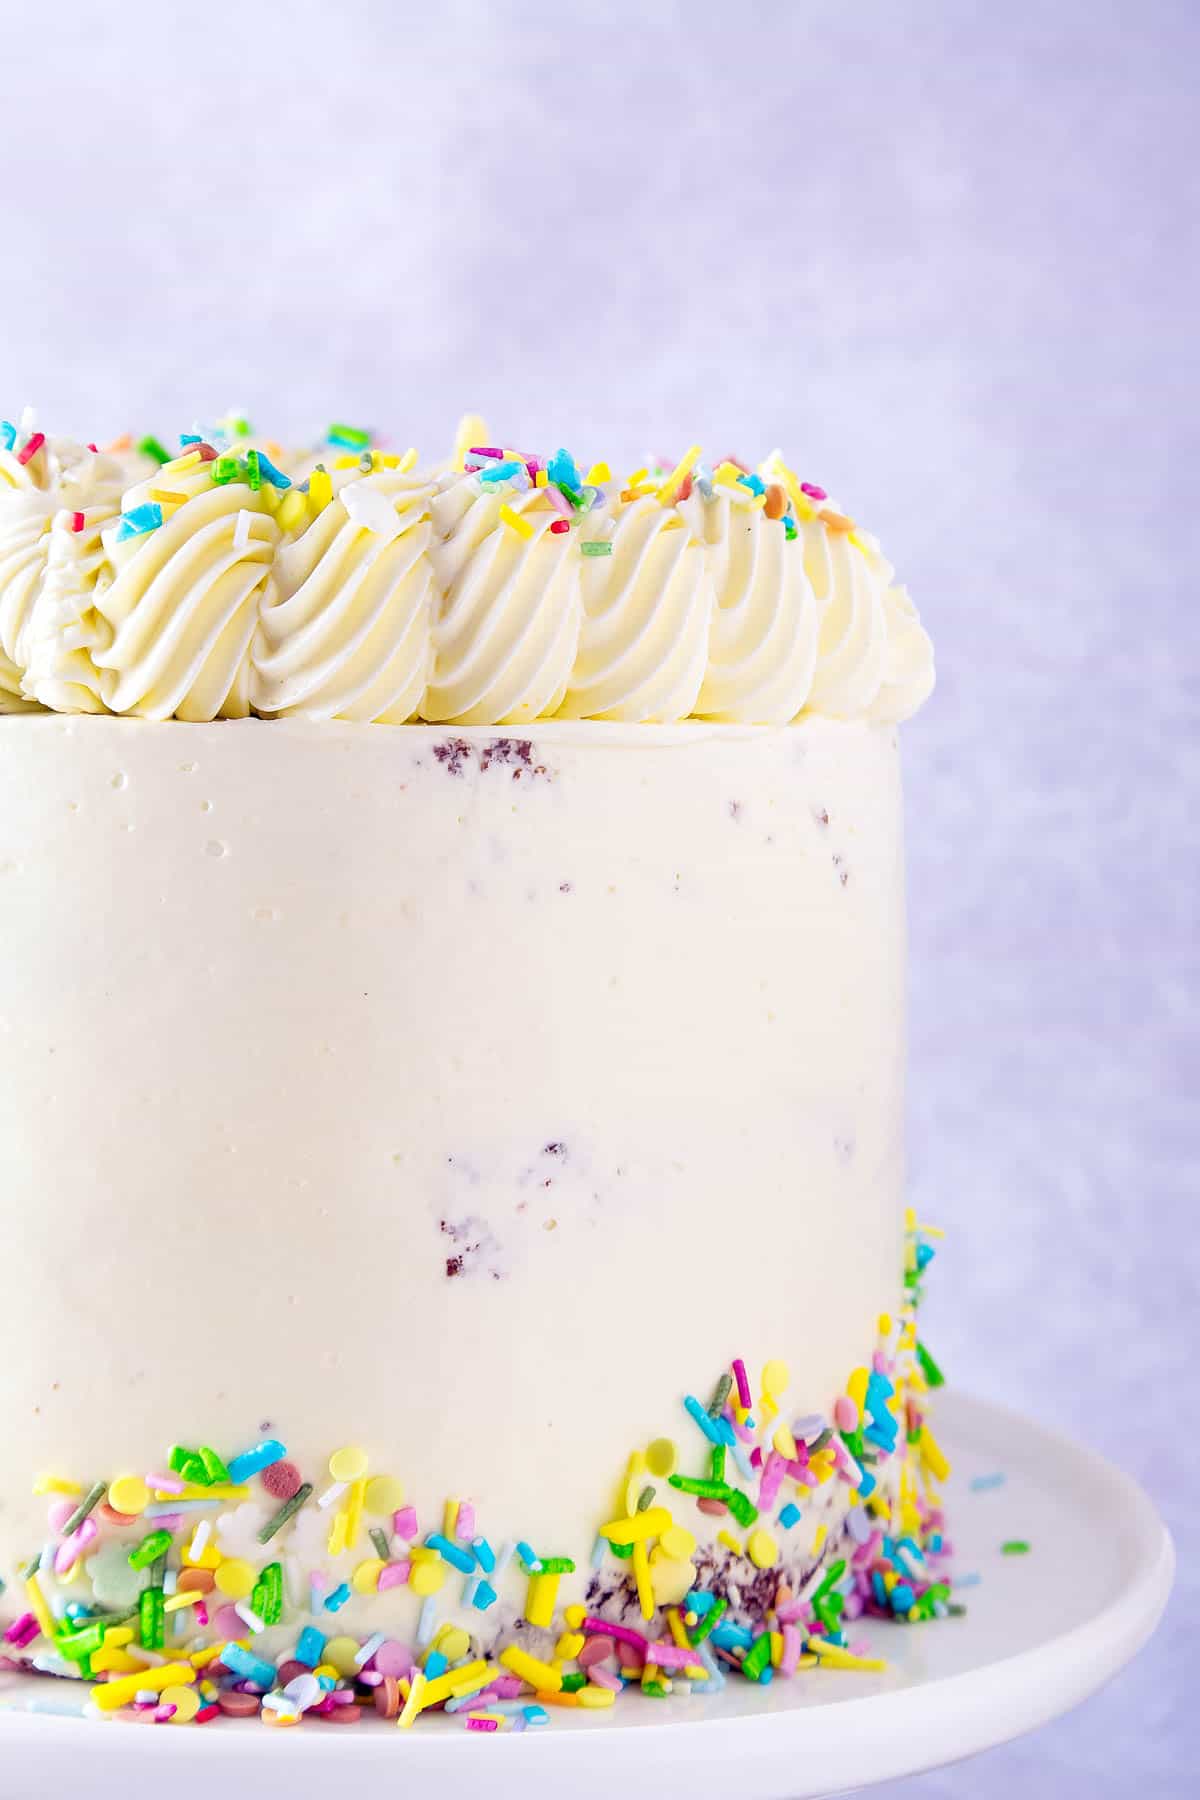
- Using a star nozzle pipe swirls of buttercream around the top of the cake; then scatter with sprinkles.
Notes
- The cake will keep in an air-tight container for up to 3 days, or you can freeze it for up to 1 month, but make sure it is well wrapped before freezing.
- If you have any leftover swiss meringue buttercream, pop it in a sealed container in the fridge for up to 2 weeks, or the freezer for 3 months.
- Make sure your eggs are at room temperature, and if not, you can warm them up by popping them in a bowl of warm tap water for 10 minutes.
- Make sure your butter is softened but not too soft. To test it, press a clean finger in the butter – it should leave an indent but not go all the way through.
- If you can’t get buttermilk then add 1 teaspoon of lemon juice or vinegar to 200ml (1 cup) of full-fat milk. Pop it to one side for 15 minutes, whilst sorting your ingredients out, by which time the milk will be ready to use.
Nutrition
DISCLAIMER
The nutritional information provided is approximate and is calculated using online tools. Information can vary depending on various factors, but we have endeavoured to be as accurate as possible.


Hi Lou. I thought I’d already posted a further question but don’t seem to be able to find it, so apologies if I’m posting twice. All I wondered was, if I’ll be making the cakes for my daughter’s wedding about 2/3 days beforehand, would I need to use simple syrup. As said in previous posts the resulting practice cakes (made the day before being eaten)were incredibly moist, so I’m not sure I’d want them any more moist than they were, because of not holding up too well, but thought I’d ask your opinion. Thanks, Clare
Hi Clare
Apologies I haven’t replied sooner, the day job and a few life things have taken me away from the blog for the last week. But, I’m back so I’ll pop an answer to both comments for you 🙂
Personally, I would use a simple syrup but only just a sprinkling, not a soaking as it is a moist cake and you don’t want it to be too moist as they won’t hold up. The simple syrup will help it keep its moisture ready for the wedding. But just go carefully, probably 1 teaspoon of syrup for each of the smaller 6″ cake layers, maybe 2 teaspoons for the 9″ inch layers and 3 teaspoons for the larger 12″ inch layers. if in doubt I’d add the syrup but be very sparing with the amount of syrup you are adding and make sure you drizzle all over the cake layers rather than concentrate in one spot.
I’ll pop a comment about the supports on the other comment for you now 🙂
Hope that helps…
Lou
Hi Lou, It’s getting closer to me making my daughter’s wedding cake (end of October). My last remaining question is, with me making 3 layers of 12″ cake and 9″ and 6″. For the 12″ and 9″ would you add any supports. I’m not stacking(tiering) this cake but I did find when I came to slicing the 12″ practice cake, it got to a point when slicing the final pieces, where the top layers slid off the bottom layer. It may have been I wasn’t meticulous about levelling tbh and it was apretty warm day, but just wondered what you thought. If you would add supports, would one central dowel suffice?
Hi Clare
And back over here now 🙂
So onto supports… For larger cakes, when I was making them as individual tiers, I would always dowel them just to help keep everything in place, especially if caterers were taking the cakes away to cut. I’d normally go for 3-5 dowels either in a triangle or square pattern that are about 2/3s of the way in from the edge of the cake, rather than close to the centre of the cake. I found that it would just help support the layers when cutting but also when I was icing the sides and top of the cake with buttercream; it just gave that little extra sturdiness. So I’d assemble the cake with the buttercream etc between the layers, then dowel, chill then first crumb coat of buttercream, chill and do the next coat. I’d probably add them to the 9″ as well, just 3 supports though, and if you wanted reassurance for the 6″, I’d go with a central dowel support.
Hope that helps as well 🙂
Lou
Hi Lou, I would like to make this cake in a deep 6inch cake pan, you do to mention how long the cake has to stay in the oven please can you let me know.
Hi Jenny
If you are baking in a deep 6-inch pan then the baking time would be around 45-50 minutes at 180C/350F. As everyone’s ovens are different, I personally tend to check on the cake around 40mins and then gauge from there whether it will need an extra 5 or 10 minutes. I’ll use a skewer to test the centre of the cake, if it comes out only slightly wet with mixture and a few crumbs, I’ll leave it for another 5 minutes. If the skewer has more batter on it then I’ll leave for a further 10 minutes, and then test again.
Also I’ll test the cake surface to see if it springs back. If it feels spongy and doesn’t spring back then it will need a few minutes more. If it springs back and the skewer is clean, then the cake is done. Leave it to cool in the tin for 10 minutes before turning out to cool completely on a wire rack. The cake needs to be completely cool before slicing otherwise you risk tearing the cake.
Hope that helps. Any questions please let me know 🙂
Thanks
Lou
Hi Louise. I am going to make my daughter’s wedding cake this October, originally we were going to have a tiered cake but now we’ll be displaying three cakes on separate wood rounds, meaning that the usual recipe I’d have used (which is a little more firm to allow it to hold up in the tiers) isn’t really necessary any longer. So, I’m after a moist, soft vanilla butter cake. I really love recipes that use buttermilk and have come across this one and really want to give it a go. I will need a 6,9 and 12″ cake, 3 layers per cake. So I have been trawling the internet for calculations on scaling up recipes. I just think I have it in the bag, but then I notice someone else suggesting different scales of increasing the amount of batter!! I don’t know if you can help me work out what I’d need? Obviously, I have your original 6″ here. Also I prefer to use plain flour and wonder would I need to add both baking powder and baking soda? I know this is a big ask, but I’m really all maxed out and can’t settle on an answer I’m confident with. I’d really appreciate any help you can give. Thanks.
Hi Clare
Congratulations to your daughter and her fiancee! October is a fabulous month to get married in, we were married in October too.
Your cake concept sounds so pretty with the wood rounds, and will certainly make a beautiful centrepiece. The vanilla cake would be perfect.
So first up in terms of scaling up the recipe, the way that I work and used to scale up when I was making wedding cakes for my bakery was to scale up from is from an 8-inch cake. But as this is a 6-inch recipe you need to scale these up to an 8-inch cake and to do that you would multiple by 2. From here to get the measurements for the 9-inch cake, you would then multiple again by 1.25, which also works out as multiplying the 6-inch ingredient quantities by 2.5. For a 12-inch cake, if we go back to the 8-inch quantities we scaled up to. We need to multiple those by 2.5 for the ingredient quantities; which also works out as multiplying the -inch ingredients by 5.
So using this recipe as the base quantities you will need to scale up as:
6-inch cake – As per the recipe card
9-inch cake – Multiple the 6-inch ingredients by 2.5
12-inch cake – Multiple the 6-inch ingredients by 5.0
Now for the flour and raising agents…
Plain flour can easily be used instead of self-raising. I would recommend a mix of baking powder and baking soda, due to the way they react. So baking powder is double action, meaning it has the activates it needs for the chemical reaction to help the cake raise; where as baking soda is single action. The baking soda needs something to react with for the chemical reaction to occur and in this case it’s the buttermilk.
Because of the way these ingredients both work, the baking powder will give you a stronger reaction; but doubling or tripling up the quantities of this might cause the cake to ‘over-rise’ and then deflate when cooling. Therefore having a mix of powder and soda, which has a slightly weaker reaction, will give you the right level of reaction needed to give the cake a light texture. Not enough of each, and the cake will be heavy and dense. Due to the nature of the reactions, it is best to make sure your baking powder and soda are in date and not ones that have been sat in the back of the cupboard for years. I’m totally guilty of this – major cake fail!
As a rule of thumb, for every 100g of plain flour in a recipe, I add 1 teaspoon baking powder. Then for baking soda, for every teaspoon of baking powder, I would add 1/4 teaspoon of baking powder.
So for the 6-inch recipe where I use 280g of flour, converting to plain flour, I would round up and use 3 teaspoons of baking powder and then 3/4 teaspoon of baking soda.
I hope this helps, but do drop me a line at hello@crumbscorkscrews.com if there’s anything guess I can help with.
Good luck and have fun!
Lou
I did reply by email Lou, but perhaps it went to your junk so here’s what it said. First off thanks so much for the amazingly detailed answer!! It’s so good of you to take the time to do that for me.
In my haste ( never could wait) I found a calculation for increasing battery quantities based on area. So that took me too 4x the recipe for your 6” cake layers.
I wanted to practice on one layer only of the 12” cos it’s a size I’ve never done before. I used the 4x ratio after dividing by 3 to get the single layer. I did use self raising flour in the end.
It has come out pretty well but it is a fairly slim layer about an inch deep, so I think your estimates may be better off usingthe 5x quantities of the 6”.
So I’m trying the 5x as we speak. My only question now is how much baking powder, do you simply use the same calculations as with everything else.
So, everyone’s opinion was that 4x the 6″ recipe was a nicer cake. More moist and soft and lovely cake all around, so that’s what I’m going to go with now. My only sticking point is making sure my baking powder is correct for 4x and also I read somewhere that doing a 9″ cake froma 6″ recipe. you don’t really need as much as 4x the recipe for eggs, cake tasted too eggy apparently. Have you found that a problem when increasing to 9″ specifically?
Once again thanks for a brilliant response. Starting to feel a lot more confident about doing this now.
Hi Clare – apologies I didn’t seem to get your email but thanks for dropping me a line here again 🙂
Sounds like you’re full steam ahead with the cakes, and getting lots of great feedback from everyone.
So for scaling up and the eggy taste… I personally don’t recommend reducing the amount of eggs in the batter; they are key to giving your cake texture and lift. However, if you wanted to experiment with egg quantities in the recipe I would go by weight, rather than just removing an egg. Therefore, you will know what quantities of flour, butter and sugar you need, so weigh the eggs (with the shells on) and use the quantity needed to match the or as closely match the weight of an ingredient – ie. if you need 200g flour, you will need 200g of eggs including the shells. This is a good technique if you are using mixed weight eggs or large eggs. I use and recommend medium eggs; therefore if you were to use large eggs the overall egg weight would be more than medium eggs.
Others also recommend increasing the amount of flavouring that you use to mask the eggy taste; so add a little extra vanilla extract.
Also, sometimes eggy tastes can be because the eggs haven’t been incorporated properly, so when whisking the eggs in, make sure they are really beaten in. This will make sure the protein strings are broken down properly which can have an effect on the egginess.
I haven’t had a problem increasing the quantities before, and there can be a few different reasons for an eggy result – from the number of eggs down to the ‘potency’ of the eggs. I find when I use eggs like the Clarence Court Burford Browns or Cacklebean Eggs that have a more intense yolk, they will also make the cake taste a bit more eggy.
I’d try with the egg weight first; it might just be a case of hitting the sweet spot. Ultimately less eggs with give you a more dense, crumblier cake due to having less protein structure.
Hope that helps! I’ll check out my junk mail now and see if I can find your email.
Thanks
Lou
Just a quick update. I made a three layer 12″ cake, for a big family get together, using the 4x adapted recipe from the 6″ layers. Have to say this cake was amazing. It was so moist and soft and an absolute delight. I paired it with Swiss Meringue Buttercream and used the egg yolks to make some lemon curd too. It was delicious and everyone gave it a huge thumbs up. In fact a few people thought it was a professionaly made cake and that’s all thanks to you sharing your recipe, so a massive thank you for sharing and your advise. Feel very confident now to tackle the three cakes that I’ll make for my daughter’s wedding in the autumn. Thank you so much Lou!
Yay!! I’m SO pleased that it has worked out so well for you and everyone gave it a thumbs up and you feel confident to tackle the cakes for your daughter’s wedding. They are going to be amazing. It is such a beautiful thing to do for a wedding. I started my cake journey and the blog because I was making my brother’s wedding cake; so I’m really happy to pass on any advice.
Thank you so much for sharing your cake journey as well, and wishing you all the very best and amazing cake wishes for the wedding in autumn.
All the best
Lou
Thanks Lou for the advice in the previous answer you gave (the one before). I’ll try and send an email in October to show you how the cake looked.Thanks again so much.
Hi Lou, Just wanted to say I did it!!!! I made three three layer cakes and they were a triumph. I cannot thank you enough for all the tips and advice you gave so freely, I literally wouldn’t have done this without your assistance. The cake was still moist after 6 days!!!!
I’m going to send a photo by email to you cos I wanted you to see how they turned out. Everyone was so complimentary, the day went off without a hitch and was an incredibly beautiful and emotional day. Thanks again Lou. I can thouroughly recommend this recipe.
Hi Clare
YAY!!! Huge congratulations on your daughter’s wedding and so happy that the day was beautiful and your cake was an utter triumph! Your email has come through so I’ll reply to you there as well, but just to say it’s an absolute pleasure to have helped you, and I’m so happy that you choose my recipe for such a special cake.
Thank you again
Lou
hi, how do I make a 8 inch cake out of this recipe?
Hi Tia
Thanks for your comment about scaling up the ingredients. The original recipe is for a three-layer 6 inch cake, and to get the measurements for a three-layer 8 inch cake, you just need to double them. For best results I do recommend using the metric weights, and a set of kitchen scales.
This recipe is intended to give you three deep layers. But if you prefer thinner layers than increase the ingredients by either 1.5 or 1.75.
Hope that helps.
Thanks
Lou
Hello, Is it any type of butter? salted ? Unsalted ?
Thanks !
Hi Isabelle
You can use either salted or unsalted, whichever you prefer. If you use unsalted butter add 1/4 teaspoon of fine sea salt. If using salted butter omit the salt. Its really down to personal preference.
Thanks
Lou
Hi,
Would like you to know that I’ve just tried this recipe the other day for my son’s birthday and it was a hit!! Oh gosh we loved it! ? Thank you so much for sharing and your tips are so helpful especially for a beginner like me. The cake is almost perfect just one thing, how come there were holes in the cake? What do you think went wrong? Just followed exactly the instructions and really wondering why it happened.
Hi Mary
Thank you for your comment, I’m so pleased to hear you love that cake and it was a hit for your son’s birthday. Happy Birthday!! I don’t think anything went wrong with your cake, so that’s good. Sometimes we get holes in cakes and this is usually caused by trapped air. This is typically due to a couple of things but normally it’s from over-mixing. You can combat this by mixing in the dry ingredients well but until they are just combined – so we’re looking for a gentle mix but making sure everything is properly combined. You can also then gently tap your cake tins when filled, on the kitchen worksurface; just to help force air bubbles to the surface. I’ll pop into the post and add this as another tip.
I’m so pleased you’ve tried the recipe and that the tips have helped. Feel free to drop me a line with any other questions.
Thanks
Lou
I recently made this cake and it was lush.
Can use the recipe to make cupcakes?
Hi Maisie – so glad to hear you made the vanilla layer cake and liked it!
You can definitely use the same recipe for cupcakes. Use a good scoop of cake batter per cupcake case, I use an ice cream scoop and bake at 180C/350F for about 18-20 minutes.The recipe will make about 12-16 cupcakes, so if you want to make a smaller batch, it’s best to half the recipe. The buttercream also works for the cupcakes too.
Hope that helps and good luck with the cupcakes.
Thanks
Lou
Hi, only made the merengue butter cream, and it looked like it was starting to split after I put the vanilla in(didn’t state in the recipe when to add it). I did beat it a bit harder but still not as smooth as I would like. Could the butter have been too cold or do you have any other suggestions. It tastes great.
Hi Sandra, glad that you tried the recipe and it tastes great!
Split or curdled Swiss Meringue buttercream usually happens when the butter is too cold, as you mention; and it the egg whites separating from the butter so they do not whip together. The buttercream can also split if you’re using chilled buttercream that hasn’t come up to room temperature fully before mixing. You can fix curdled Swiss Meringue buttercream by reheating about 50-75g of the mixture in the microwave until it’s just melted, but not boiling. Then when whipping the remaining mixture on about medium speed, pour in the melted buttercream and increase the mixer speed for about 2 minutes to bring the buttercream back to a smooth and glossy texture.
I’ll add in the vanilla to the recipe, thanks for letting me know; and I’ll be doing a Swiss Meringue buttercream post soon to cover off all the hints and tips.
Any other questions do drop me an email.
Thanks
Lou
Just made this cake. Wanted to make it in one tin but my tin was obviously not deep enough as I ended up with it all over the bottom of my oven and it would not cook. Retried it in the three tins and its perfect thank you.
Fabulous, thank you for your comment Sue. I’m glad that the cake turned out all ok in the end. I love this as my go to vanilla cake recipe. I’ve updated the recipe instructions to say if baking in one pan, it should be a deep pan. Just in case anyone else has the same issue.
Hello,
Do I click x3 if I want to make three layers in their individual tins?
Thanks x
Hi Sheridan
Nope you don’t have to, the recipe is for three 6-inch round layers. You can either bake as one 6-inch cake if you only have 1 cake pan and then slice that into three equal layers, or if you have three cake pans of the same size, you can split the batter equally between them and bake as individual layers. I prefer to bake as three individual layers but understand that not everyone has three individual cake pans to do this in.
You can also use the same recipe for a two layer 8-inch cake.
Hope that helps. Drop me an email if you have any queries
Thanks
Lou x
What is the proper way to convert the recipe into one 9″ cake?
Hi Natalee
Thanks for your comment. In terms of scaling up the recipe to a 9-inch cake pan, as a rule of thumb I would start with the 8-inch size and scale up to 9-inch by multiplying the ingredients by 1.25. As this recipe starts with a 6-inch cake, to get to the 8-inch size, you would double this first, then multiply by 1.25 to get the ‘proper’ conversion for a 9-inch cake. Or you can just multiply the original 6-inch ingredients by 2.5. However, the quantities can vary depending on how deep you would like the layers, and if you are baking in individual cake tins or all as one that you then split.
For this recipe, as I prefer fairly deep cake layers and bake them individually, for a 9-inch cake I personally would multiply the ingredients listed in the recipe by 2.25 to get nice even, not too deep layers.
Hope that helps. Any questions, feel free to drop me an email.
Thanks
Lou
hi I’m just wondering is the recipe for the three layers or is the X3 for three layers. Or is the X3 for three cakes. I’m assuming layers but I just wanted to double check
Hi Catrin – the recipe is for three layers. You can either bake as one cake and then slice that into three equal layers, or if you have three cake pans of the same size, you can split the batter equally between them and bake as individual layers. I prefer to bake as three individual layers but understand that not everyone has three individual cake pans to do this in. I’ll update the start of the recipe to say line three cake pans if you are baking the layers individually. Hope that helps.
I love this cake – it’s one of our absolute favourites!